


ついに、ついにブログ検索順位取得ツールが完成しました(!?)
(?)は、まだ追加したい機能もあるものの、「もう十分じゃない?」という思いから。
一時はやる気をなくしてPythonから離れていましたが、なんとか完成までくることができました。
今回は、今までのまとめ、前回の記事から追加した部分、そしてツールのソースコード全部載せでお送りします。
作りたいもの
作りたい『ブログ検索順位取得ツール』の主な機能をあげますと
- GUI操作でExcelファイルを選択する
- Excelにある検索キーワード一覧を読み込む
- 検索キーワードをGoogle検索する
- Google検索結果の中に、当ブログが入っているかチェックする
- ブログの順位と記事タイトル・URLをExcelに記入する
- 検索キーワードと順位を表形式でGUI画面に表示する
- チェックを入れたキーワードの順位変動をグラフにする
- チェックは全選択、全選択解除を可能にする
GUI画面のイメージ図です。

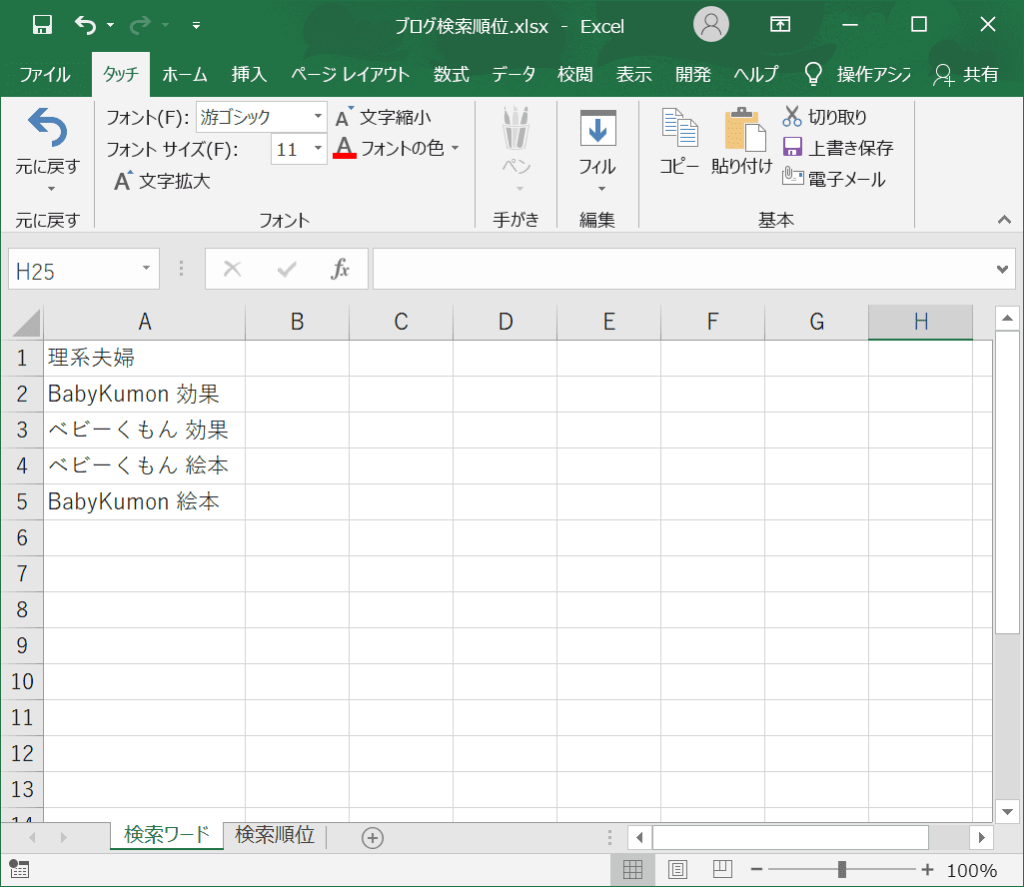
Excelファイルのフォーマットは以下のようにしました。
「検索ワード」シートに検索したいキーワードを書いておきます。
「検索順位」シートに検索でヒットした記事のURLとタイトル、順位を記載していきます。

これまでの道のり(9記事)
Pythonで作りたい機能が全部実装できるか分からないまま見切り発車したのですが、なんやかんやありまして、形になってきました。
その経緯は以下の9記事に書いてあります。
その1:Pythonの導入からのGoogle検索

その2:Google検索結果の取得

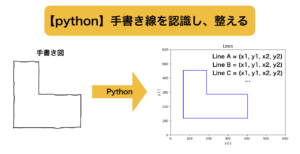
その3:検索結果からURLとタイトルを取り出す

その4:Excelファイルを読み込む

その5:Excelファイルに書き出す

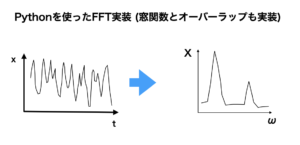
その6:Matplotlibでグラフを作ってみる

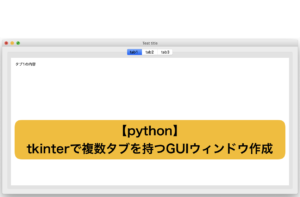
その7:tkinterでファイル選択ダイアログを表示

その8:tkinterでチェックボックス入りの表とスクロールバーを表示

その9:複数チェックボックスの制御

追加した機能(グラフ作成ボタンの機能)
前回の記事から追加したのは、グラフ作成ボタン機能です。
これにおいて、以前は日本語表示はしないからイイやと思っていたのですが、グラフの凡例に日本語の表示が必須となってきたので、Matplotlibの日本語化も行いました。
「make plot」ボタンが押された際に呼び出される関数を、以下のように書きました。
#プロット作成ボタンをクリック
def make_plot():
	global list_keyword
	global list_chk

	num_list = len(list_keyword)

	list_plot_keyword = []

	for ilist in range(num_list):
		bln = list_chk[ilist].get()   #checkbuttonの値
		#print(bln)
		if bln == True:  #チェック済みの行
			list_plot_keyword.append(list_keyword[ilist])

	#Excelのデータを取得
	list_date,list_plot_data = getPlotData(*list_plot_keyword)

	list_datetime = []
	#日付文字列を日付型に変換
	for i in range(len(list_date)):
		tdatetime = datetime.datetime.strptime(list_date[i], '%Y/%m/%d')
		tdate = datetime.datetime(tdatetime.year,tdatetime.month, tdatetime.day)
		list_datetime.append(tdate)

	#Plot作成
	for ilist in range(len(list_plot_keyword)):
		plt.plot(list_datetime, list_plot_data[ilist],label=list_plot_keyword[ilist])

	#get current axes
	ax = plt.gca()
	#x軸フォーマット設定
	ax.xaxis.set_major_formatter(mdates.DateFormatter('%m/%d'))
	#x軸の間隔を7日に
	ax.xaxis.set_major_locator(mdates.DayLocator(interval=7))
	#y軸の間隔を5に
	ax.yaxis.set_major_locator(ticker.MultipleLocator(5))
	#目盛りを内側に
	ax.tick_params(direction = 'in')
	#y軸の範囲
	plt.ylim(ymin=0,ymax=50)

	#軸ラベル
	plt.xlabel('day')
	plt.ylabel('rank')
	#凡例
	plt.legend(bbox_to_anchor=(0,1.02,1,1.02), #グラフの上に
				loc='lower center',            #凡例の下中央を合わせる
				borderaxespad=0,               #隙間はなし
				ncol=3,                        #3列で表示
				mode='expand')                 #拡大させる
	#grid追加(点線に設定)
	plt.grid(linestyle= '--')

	plt.show()
47~51行目で凡例の設定をしています。
まだ追加していない機能(今後入れるかも)は、「スクロールバーをマウス操作できるようにする」ことです。
今は後回しにしています。

ツール実行の様子
ツールの画面や実行の様子をご紹介します。
ブログ順位のアップデート
ブログの順位を取得する部分について、画面を紹介します。
以下のように表形式で、一番左にチェックボックスを付けてExcelファイルの中身を表示しています。
画面に表示される順位は、一番最後に検索した日付の順位です(Excelの一番右のセルの値をもってきている)。

「Update Rank」ボタンをクリックしてしばらくした後の画面は以下のようになります。
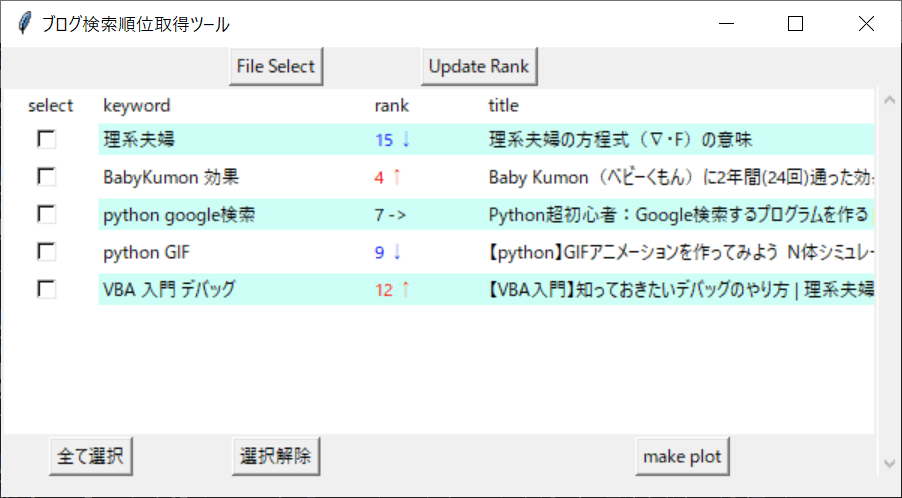
ブログの順位をアップデートし、順位が上がっていたら赤で「↑」も追加します。
逆に順位が下がっていたら青で「↓」を追加。
順位が前回と同じなら黒で「->」を追加して表示します。
また、50位以内にブログ記事がない場合は「None」と表示するようにしました。
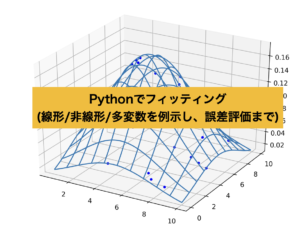
グラフ作成
グラフはメインのGUI画面に埋め込むのではなく、別ウィンドウでそのまま表示させています。
こちらはGIF動画でご覧ください。
こんな感じでグラフが作成されます。
ひとまず、イメージしていたツールの機能が備わりました!
ブログ検索順位取得ツールのソースコード全部載せ
長いので関数ごとに区切って載せますね。
あと、自分のみ使用すること前提で作っており、必要なエラー対策とかしていませんので、参考にする際はご注意ください。
さらに注意点として、ブログのプラグインの影響で、「<」「>」が文字化けしています。
心の目で、おそらく「<」だろうと感じてください。
なんとか対応しろよというご指摘はごもっともですが、上手くいかなかったので放置しています(汗)
メイン
import os
import sys
import tkinter
from tkinter import messagebox
from tkinter import filedialog
import tkinter.ttk
import requests as web
import bs4
import openpyxl as px
import datetime
from time import sleep
import matplotlib.pyplot as plt
import matplotlib.dates as mdates
import matplotlib.ticker as ticker

rt_width=600
rt_hgt=300

#main
def main():

	global root
	root = tkinter.Tk()
	root.title('ブログ検索順位取得ツール') #タイトル

	root.geometry(str(rt_width)+'x'+str(rt_hgt)) #サイズ

	#ファイル選択ボタンを作成
	selectButton = tkinter.Button(root, text='File Select',command=select_click)
	selectButton.grid(row=0,column=1)
	#順位アップデートボタン
	updateButton = tkinter.Button(root, text='Update Rank',command=update_click)
	updateButton.grid(row=0,column=2)

	#バインディング設定
	root.bind('<Configure>', change_size)

	#ウィンドウを動かす
	root.mainloop()

if __name__ == '__main__':
	main()
ファイル選択ボタンの関数
#selctボタンを押したときの処理
def select_click():

	fileType = [('Excelファイル','*.xlsx')] #ファイルタイプをExcelファイルに指定
	iniDir = os.path.abspath(os.path.dirname(__file__)) #初期表示フォルダ
	global filepath

	filepath = filedialog.askopenfilename(filetypes=fileType,initialdir = iniDir)

	if len(filepath) < 1:
		print('exit ブログ検索順位取得ツール')
		sys.exit()

	#Excel読み込み 戻り値はリストを3つ返す
	global list_keyword
	global list_rank
	global list_title
	list_keyword,list_rank,list_title=readExcelFile()
	makeList()
Excelファイル読み込み関数
def readExcelFile():
	#Excelブックオープン
	global filepath
	book = px.load_workbook(filepath)
	#シート名取得
	sheet = book.sheetnames
	for i in range(len(sheet)):    #シート数分ループ
		if sheet[i] == '検索ワード':
			#シートを設定
			ws = book[sheet[i]]
		if sheet[i] == '検索順位':
			#シートを設定
			wr = book[sheet[i]]

	#最大行の取得
	erow = ws.max_row

	word_list = []  #検索ワードリスト
	title_list = [] #記事タイトルリスト
	rank_list = []   #順位リスト

	for i in range(erow):  #最終行までループ
		#セルの値をリストに追加
		word_list.append(ws.cell(row=i+1,column=1).value)
	i=1
	while wr.cell(row=1,column=i).value != None:
		i=i+1
	ecol = i-1  #最終列

	for ilist in range(len(word_list)):
		keyword = word_list[ilist]

		flg = 0
		i=0
		while wr.cell(row=i+1,column=1).value != None:  #空白セルまでループ
			if wr.cell(row=i+1,column=1).value == keyword:
				flg = 1
				now_row = i+1
				break
			i=i+1
		if flg != 1:  #順位シートにキーワードがなかった場合
			now_row = i+1

		if wr.cell(row=now_row,column=3).value==None:
			title=''
		else:
			title=wr.cell(row=now_row,column=3).value
		if wr.cell(row=now_row,column=ecol).value == None:
			rank=''
		else:
			rank=wr.cell(row=now_row,column=ecol).value
		#リストに追加
		title_list.append(title)
		rank_list.append(rank)

	if len(word_list) != len(title_list):
		print('error list num is not equal')
		print('word:'+str(len(word_list)))
		print('title:'+str(len(title_list)))
	if len(word_list) != len(rank_list):
		print('error list num is not equal')
		print('rank:'+str(len(rank_list)))

	return word_list, rank_list, title_list

GUI上に表を作成する関数
#表を作成
def makeList():

	global list_keyword
	global list_rank
	global list_title

	num_list = len(list_keyword) #リストの数

	if 'rank_str_list' in globals():    #update or 画面サイズ変更
		print('rank update')
	else:
		global rank_str_list
		rank_str_list = list_rank     #ファイル読み込み時の表示

	#Canvas widgetを生成
	cv_width=rt_width-20
	cv_hgt=rt_hgt-70
	canvas = tkinter.Canvas(root,width=cv_width,height=cv_hgt,bg='white') #背景を白に
	canvas.grid(row=1,rowspan=num_list,column=0,columnspan=5)     #7行x5列分

	#スクロールバー
	vbar=tkinter.ttk.Scrollbar(root,orient=tkinter.VERTICAL) #縦方向
	vbar.grid(row=1,rowspan=33,column=5,sticky='ns')

	#スクロールバーの制御をCanvasに通知する処理
	vbar.config(command=canvas.yview)

	#Canvasの可動域をスクロールバーに通知する処理
	canvas.config(yscrollcommand=vbar.set)

	#スクロール可動域<=これがないと、どこまでもスクロールされてしまう。
	sc_hgt=25*(num_list+1)
	print(str(sc_hgt))
	canvas.config(scrollregion=(0,0,cv_width,sc_hgt))

	#Frameを作成
	frame = tkinter.Frame(canvas,bg='white') #背景を白に

	#frameをcanvasに配置
	canvas.create_window((0,0),window=frame,anchor=tkinter.NW,width=canvas.cget('width'))   #anchor<=NWで左上に寄せる

	#各ラベルの幅(文字がある場合は文字ユニットとなる)
	c0_width=5  #チェックボックス
	c1_width=25 #検索キーワード
	c2_width=10  #順位
	c3_width=70 #記事タイトル

	#header row=1に設定する文字列 余白は0に
	e0=tkinter.Label(frame,width=c0_width,text='select',background='white')
	e0.grid(row=1,column=0,padx=0,pady=0,ipadx=0,ipady=0) #0列目

	e1=tkinter.Label(frame,width=c1_width,text='keyword',background='white',anchor='w')
	e1.grid(row=1,column=1,padx=0,pady=0,ipadx=0,ipady=0) #1列目

	e2=tkinter.Label(frame,width=c2_width,text='rank',background='white',anchor='w')
	e2.grid(row=1,column=2,padx=0,pady=0,ipadx=0,ipady=0) #2列目

	e3=tkinter.Label(frame,width=c3_width,text='title',background='white',anchor='w')
	e3.grid(row=1,column=3,padx=0,pady=0,ipadx=0,ipady=0) #3列目

	irow = 2
	irow0=2
	erow=num_list+irow0

	global list_chk
	list_chk = []

	while irow < erow:   #リストの数分ループしてLabelとチェックボックスを設置
		#色の設定
		if irow%2==0:
			color='#cdfff7'  #薄い青
		else:
			color='white'

		#チェックボックスの設置
		bln=tkinter.BooleanVar()
		bln.set(False)
		c = tkinter.Checkbutton(frame,variable = bln,width=c0_width,text='',background='white')

		list_chk.append(bln) #チェックボックスの初期値
		print(list_chk[irow-irow0].get())

		c.grid(row=irow,column=0,padx=0,pady=0,ipadx=0,ipady=0)  #0列目
		#検索キーワード
		a1=list_keyword[irow-irow0]
		b1=tkinter.Label(frame,width=c1_width,text=a1,background=color,anchor='w')
		b1.grid(row=irow,column=1,padx=0,pady=0,ipadx=0,ipady=0) #1列目
		#検索順位
		a2=rank_str_list[irow-irow0]
		if ('↑' in str(a2)) == True:
			a2color = 'red'
		elif ('↓' in str(a2)) == True:
			a2color = 'blue'
		else:
			a2color = 'black'
		b2=tkinter.Label(frame,width=c2_width,text=a2,foreground=a2color,background=color,anchor='w')
		b2.grid(row=irow,column=2,padx=0,pady=0,ipadx=0,ipady=0) #2列目
		#記事タイトル
		a3=list_title[irow-irow0]
		b3=tkinter.Label(frame,width=c3_width,text=a3,background=color,anchor='w')
		b3.grid(row=irow,column=3,padx=0,pady=0,ipadx=0,ipady=0) #3列目

		irow=irow+1

	#リストの下に設置するチェックボックスとボタン
	allSelectButton = tkinter.Button(root,text='全て選択',command=allSelect_click)
	allSelectButton.grid(row=erow,column=0)  #1列目
	allClearButton = tkinter.Button(root, text='選択解除',command=allClear_click)
	allClearButton.grid(row=erow, column=1)   #1列目
	plotButton = tkinter.Button(root, text='make plot',command=make_plot)
	plotButton.grid(row=erow,column=3)   #3列目
検索順位アップデートボタンの関数
# 順位アップデートボタンの動作
def update_click():
	global filepath
	global list_keyword
	global list_rank
	global list_title
	global rank_str_list

	#ファイル読み込み済みか
	if 'list_keyword' in globals():
		rank_str_list = [0]*len(list_rank)  #初期化
		old_rank_list = list_rank
	else:
		print('ファイル選択を先に行ってください')
		return

	#google検索
	for ilist in range(len(list_keyword)):
		keyword = list_keyword[ilist]
		#google検索
		rank, title = searchGoogle(keyword)

		if old_rank_list[ilist] == '×':
			old_rank = 100
		else:
			old_rank = int(old_rank_list[ilist])

		print(keyword)
		print(str(rank) + '位:前回' + str(old_rank) + '位')
		print('----------------------------------------------------')

		if rank == 100:  #50位以内にない
			rank_str_list[ilist] = 'none'
		elif rank > old_rank:
			rank_str_list[ilist] = str(rank) + ' ↓ '
		elif rank < old_rank:
			rank_str_list[ilist] = str(rank) + ' ↑ '
		else:
			rank_str_list[ilist] = str(rank) + ' -> '

		list_title[ilist] = title
		list_rank[ilist] = rank

		if ilist < (len(list_keyword)-1):
			sleep(60)  #60秒待つ(Googleの検索制限対策)

	#Excelに順位書く
	writeNewRank()

	#画面表示
makeList()注意点として、1回の検索ごとに1分間sleepを入れています(44~45行目)。
そうしないと、検索数が多くてGoogle様に怪しまれ、検索できなくなってしまいます。
30秒待ちだと40件くらいの検索が限界でしたので、今は60秒待ちにしています。
Google検索する関数
#Google検索して順位とタイトルを返す
def searchGoogle(keyword):

	#リクエストヘッダー
	headers = {"User-Agent": "Mozilla/5.0 (Windows NT 10.0; Win64; x64) AppleWebKit/537.36 (KHTML, like Gecko) Chrome/70.0.3538.77 Safari/537.36"}

	#上位50件まで検索結果を取得
	url = 'https://www.google.co.jp/search?hl=ja&num=50&q=' + keyword

	#接続
	response = web.get(url, headers=headers)

	#HTTPステータスコードをチェック(200以外は例外処理)
	response.raise_for_status()

	#取得したHTMLをパース
	soup = bs4.BeautifulSoup(response.content, 'html.parser')

	#検索結果のタイトルとリンクを取得
	ret_link = soup.select('.r > a')

	title_list = []
	url_list = []

	for i in range(len(ret_link)):
	#	タイトルのテキスト部分を取得
		title_txt = ret_link[i].get_text()

	#	リンクのみを取得し、余計な部分を削除する
		url_link = ret_link[i].get('href').replace('/url?q=','')

		title_list.append(title_txt)
		url_list.append(url_link)

	blog_url = "https://rikei-fufu.com"

	#print(blog_url in url_list)  #これだとFalseが返ってくる
	flg = 0
	for i in range(len(title_list)):
		str_url = url_list[i]
		if str_url.startswith(blog_url):
			print('ブログが検索結果にありました')
			blog_no = i + 1
			blog_title_s = title_list[i]

			#タイトルの後のURLは削除
			cut=blog_title_s.find(blog_url) #インデックス
			blog_title = blog_title_s[:cut]

			print('順位:' + str(blog_no) + '位')
			print('記事:' + blog_title)
			flg = 1
			break
	if flg != 1:
		print('検索範囲内にブログはありませんでした。')
		blog_no = 100
		blog_title = ''

	return blog_no, blog_title
検索順位をExcelに書き込む関数
#Updateした順位をExcelに書き込む
def writeNewRank():
	global filepath
	global list_keyword
	global list_rank
	#Excelブックオープン
	book = px.load_workbook(filepath)
	#シート名取得
	sheet = book.sheetnames
	for i in range(len(sheet)):    #シート数分ループ
		if sheet[i] == '検索順位':
			#シートを設定
			wr = book[sheet[i]]

	#検索順位を書く列
	i=1
	while wr.cell(row=1,column=i).value != None:
		i=i+1
	ncol=i

	#日付
	td = datetime.date.today().strftime('%Y/%m/%d')  #今日の日付
	wr.cell(row=1,column=ncol,value=td)

	for ilist in range(len(list_keyword)):
		#行を取得
		i=0
		flg=0

		if list_rank[ilist] == 100:
			rank='×'
		else:
			rank = list_rank[ilist]

		while wr.cell(row=i+1,column=1).value != None: #空白セルまでループ
			if wr.cell(row=i+1,column=1).value == list_keyword[ilist]:
				flg=1
				nrow=i+1
				break
			i=i+1
		if flg != 1:
			wr.cell(row=i+1,column=1,value=list_keyword[ilist])
			nrow=i+1
		#書き込む
		wr.cell(row=nrow,column=ncol,value=rank)

	book.save(filepath)
プロット作成ボタンの関数
上で紹介したプロット作成のと同じです。
#プロット作成ボタンをクリック
def make_plot():
	global list_keyword
	global list_chk

	num_list = len(list_keyword)

	list_plot_keyword = []

	for ilist in range(num_list):
		bln = list_chk[ilist].get()   #checkbuttonの値
		#print(bln)
		if bln == True:  #チェック済みの行
			list_plot_keyword.append(list_keyword[ilist])

	#Excelのデータを取得
	list_date,list_plot_data = getPlotData(*list_plot_keyword)

	list_datetime = []
	#日付文字列を日付型に変換
	for i in range(len(list_date)):
		tdatetime = datetime.datetime.strptime(list_date[i], '%Y/%m/%d')
		tdate = datetime.datetime(tdatetime.year,tdatetime.month, tdatetime.day)
		list_datetime.append(tdate)

	#Plot作成
	for ilist in range(len(list_plot_keyword)):
		plt.plot(list_datetime, list_plot_data[ilist],label=list_plot_keyword[ilist])

	#get current axes
	ax = plt.gca()
	#x軸フォーマット設定
	ax.xaxis.set_major_formatter(mdates.DateFormatter('%m/%d'))
	#x軸の間隔を7日に
	ax.xaxis.set_major_locator(mdates.DayLocator(interval=7))
	#y軸の間隔を5に
	ax.yaxis.set_major_locator(ticker.MultipleLocator(5))
	#目盛りを内側に
	ax.tick_params(direction = 'in')
	#y軸の範囲
	plt.ylim(ymin=0,ymax=50)

	#軸ラベル
	plt.xlabel('day')
	plt.ylabel('rank')
	#凡例
	plt.legend(bbox_to_anchor=(0,1.02,1,1.02), #グラフの上に
				loc='lower center',            #凡例の下中央を合わせる
				borderaxespad=0,               #隙間はなし
				ncol=3,                        #3列で表示
				mode='expand')                 #拡大させる
	#grid追加(点線に設定)
	plt.grid(linestyle= '--')

plt.show()プロットするデータの取得関数
def getPlotData(*list_plot_keyword):
	global filepath
	#Excelブックオープン
	book = px.load_workbook(filepath)
	#シート名取得
	sheet = book.sheetnames
	for i in range(len(sheet)):    #シート数分ループ
		if sheet[i] == '検索順位':
			#シートを設定
			wr = book[sheet[i]]
	i=3
	#最終列取得
	while wr.cell(row=1,column=i).value != None:
		i=i+1
	ecol=i   #最終列

	date_list = [] #日付のリスト

	for icol in range(4,ecol):
		date_list.append(wr.cell(row=1,column=icol).value)

	num = len(date_list)
	#全キーワード分の順位のリスト
	plot_data = [[0 for i in range(num)] for j in range(len(list_plot_keyword))]

	#指定キーワードの行を探す
	for ilist in range(len(list_plot_keyword)):
		keyword = list_plot_keyword[ilist]

		i = 1
		while wr.cell(row=i+1,column=1).value != None:
			if wr.cell(row=i+1,column=1).value == keyword:
				nrow = i+1
				break
			i=i+1

		for icol in range(4,ecol):
			rank = wr.cell(row=nrow,column=icol).value
			if rank == None:
				rank = 0
			elif rank == '×':
				rank = 100

			plot_data[ilist][icol-4] = rank

	#plotデータのlistを返す
	return date_list, plot_data
その他(画面サイズ変更、チェックボックス制御)
#ユーザーによる画面サイズ変更
def change_size(event):
	global rt_width
	global rt_hgt
	if root.winfo_width() != rt_width:
		rt_width=root.winfo_width()
		rt_hgt=root.winfo_height()
		makeList()

#全て選択をチクリック
def allSelect_click():
	for i in range(len(list_chk)):
		list_chk[i].set(True)

#選択解除をクリック
def allClear_click():
	for i in range(len(list_chk)):
		list_chk[i].set(False)
ふぅ。
けっこう長くなったつもりでしたが、ざっと500行ほどのコードでした。
Python初心者でも、ネットで調べながら、これくらい作れました。
いまのところきちんと動いています。
何かご指摘やコメントがあればお気軽にお願いします☆
次は何を作ろうかな~
んじゃ、また~
おススメのプログラミング独学方法はこちらの記事にまとめました!


コメント